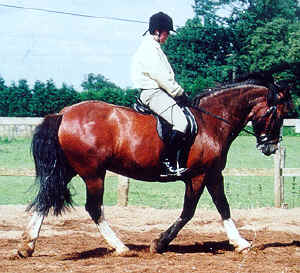
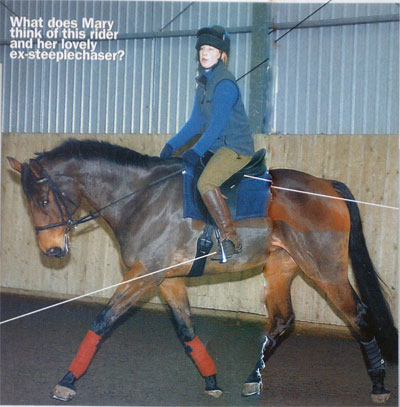
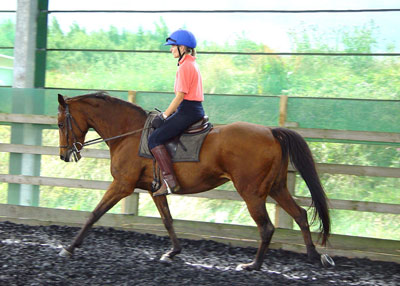
This photograph shows one of my colleagues, a senior teacher in my network of coaches, riding a nineteen year old Holsteiner gelding who came from Hungary as a four year old. With his owner, the horse has done unaffiliated eventing, affiliated showjumping to foxhunter level, and affiliated dressage to medium level.
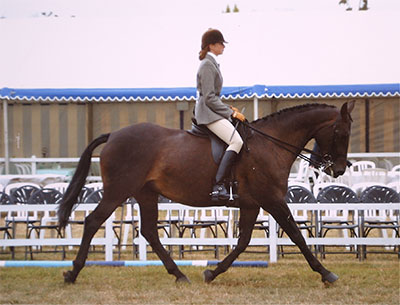
The photograph shows sitting trot, in which the rider’s biomechanics are unusually good. If we took her horse out from under her by magic, she would land on the riding arena on her feet, and would remain balanced on them. Her thigh and calf make a good arrowhead shape, with symmetry in their angles and the knee at the point of the arrow. She has her heel down in the right way – aiming on a line towards the horse’s hock, and not forwards and down towards his knee.
In their attempt to get the heel down, many rides loose this correct aim and push the lower leg forward, also loosing the vertical shoulder/hip/heel line. It is in jumping that it pays to have the heel down and forward, and along with this the backside folds backwards and the upper body is bought forward. This maintains an overall balance in which the rider would still land on her feet on the riding arena if the horse disappeared by magic. In flatwork the loss of this is extremely costly, but few riders make a big enough distinction between the rider biomechanics of a flatwork lower leg and a jumping lower leg
In both, the foot rests rather than presses into the stirrup, and this allows the rider’s joints to maintain their ‘give’ or shock absorption. As soon as the foot presses on the stirrup, this downward force creates an equal and opposite upward force, which straightens the rider’s joints and thwarts her best attempts to sit well. This is why people tend to do better in sitting trot without their stirrups – for if you have not got them you cannot press on them.
The line of the rider’s back is more hollow than one would ideally like to see. You see her backside out behind her, and when the rider is dead right, backsides of all shapes and sizes disappear. (I sometimes wonder if the publicity for my courses would be more effective if it said not ‘ we can show you how to ride far better than you ever dreamt possible’ but ‘we can make your backside disappear’!) The flesh that is out behind this rider needs to come underneath her backside, and this would give her the shape I call ‘square bum’. Men show this naturally, but women tend to struggle with it. This facet of good rider biomechanics is harder for us to achieve.
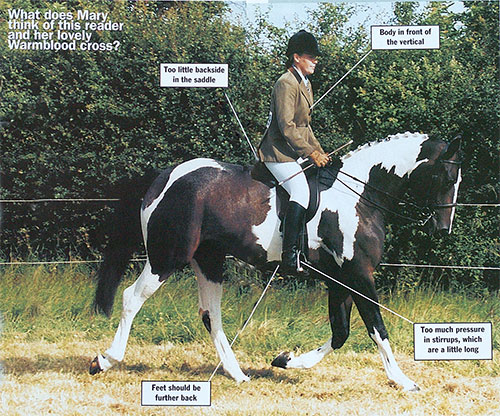
For a quick lesson in seat bone placing, sit on your hands on a hard chair, placing them palm down. Your seat bones will probably be quite obvious, and may become painfully obvious as we continue the exercise, although the learning this generates should be worth the discomfort. Firstly hollow your back and notice where they point. Then round your back and notice where they point. Move between the extremes of hollow and round until you find the point where they point vertically down.
You are then stacked up in the alignment that physiotherapists call ‘neutral spine’, which is the ideal alignment for riding. This alone is a major change for many riders, for most people ride with either a hollow or a round back. You have to reach the stage where this correction is easy to find and maintain in your riding before you can translate the following part of the exercise onto your horse. It illustrates a facet of rider biomechanics that can make you much more effective.
Keeping your seat bones pointing down, now slide them back over the flesh in your backside, and forward over the flesh in your backside. Do this slowly, realising that your knees also move forward and back. But the important thing is to notice how many fingers you can move your seat bones over. Most people get close to three, and you should expect to find that you have this much leeway. If you don’t, practice until you do. Ideally, do the exercise sitting sideways on to a large mirror, so you can see how your back and your backside change shape at each stage. This will also show you ‘how much is enough’ for you to loose the look of being hollow backed, and/or for you to have buttocks that look square instead of round.
The rider in the photograph needs not so much to bring her waistband back as to slide her seat bones back over her flesh. A man’s seat bones are naturally further back in his backside than a woman’s (and he also has less flesh) so this placing comes naturally to him. Notice how on men, you see a pretty straight line to the back, which continues down to the ‘back corners’ of the backside. There is then a short horizontal line of flesh which lies on the saddle before back of the thigh comes down. That shape typifies the ideal for both sexes. The secrets of the disappearing backside are the ‘waistband back’ correction that takes the hollow out of your back, and then sliding your seat bones back over your flesh. But they are also two significant secrets of skilled rider biomechanics! Master these, and you kill two birds with one stone!
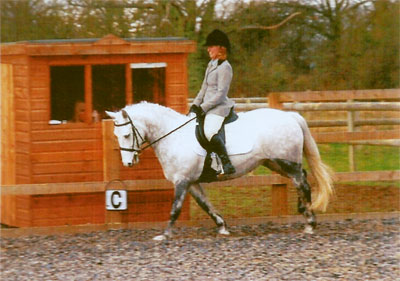
The rider’s reins are a little longer than they should ideally be, and it looks as if she may have rounded her wrists a little to take up some of the slack in the rein. The contact is obviously very light, and the rider is not holding the horse’s head in place. Yet his nose is a little behind vertical, and for this to change he needs to let go a little in the muscles underneath his neck.
Try tightening the front of your neck, and notice how this pulls your chin down and in. The same thing has happened to this horse, and when a horse is working well, he holds his neck up using the muscles along the top of it. This leaves the head free to hang off the end of it ‘like a chandelier’, as some of the classical literature says so beautifully. Once the muscles along the underneath of the neck become involved, their over-activity pulls the nose in behind vertical, and extreme examples of this are often the legacy of riding in draw reins.
Letting go would make the underside of the neck more of a curve than a straight line, and would open the angle under the gullet even more. This change would then affect the top of the neck, giving a more even curve from wither to poll. The loss of this tension in the neck would create a very correct picture in this horse.
The icing on the cake would be for the rider to look up. I cut riders quite a lot of slack with this facet of good rider biomechanics, as whenever we are using a lot of ‘brain space’ to process information we tend to look down. If you ask someone a question they cannot answer, they will tend to avert their eyes from you, look down, withdraw into themselves, ‘Uhm’ a few times, and then look up at you again once they have fathomed out the answer. If you are going to do a good job when riding a test, you have to find answers very quickly, so that you have plenty of ‘brain space’ for riding the movements and showing off your horse. But the co-ordinations of riding have to come very easily to you for that to be the case, and whilst you are racking your brains to find them, you may need to look down.
I know this rider well enough to know that whilst she still needs to rack her brains at times, she is well on the track of her own learning process. That means that her experiences when she is riding teach her more about riding. She does not blink and miss it when either she hits a good moment, or when she looses what has been working well. Instead she is mentally on the case, working out what she got when she got it, and what she lost when she lost it.
It is this process that enables her to do it right more and more of the time, and to gain ever more clarity on the cause/effect rules of rider biomechanics. So it gradually becomes clear to her that ‘When I do A, the horse does B. When he does X to me, I do Y’. With this knowledge, the mysteries of riding unravel themselves, bringing clarity to what can seem such a strange impenetrable skill. As far as I can make out, this is learning that can go on for a lifetime. This is one of the factors that makes riding so addictive!