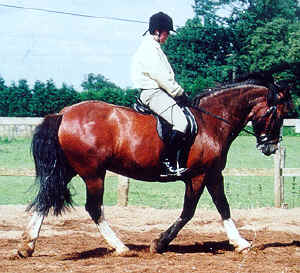
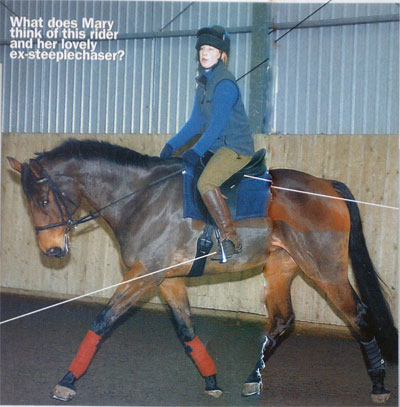
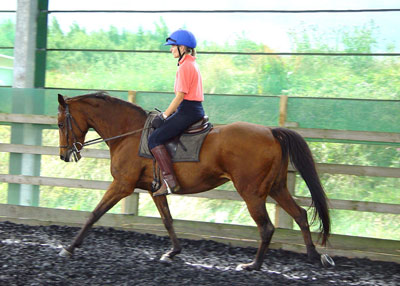
The photograph shows a 11 year old girl riding a horse she has owned for one year. He is a 12 year old Arab/Welsh cross, and is, she tells me, her best pal. It gives me a real kick to see her doing such a great job, especially given that she is a pupil of a pupil of mine, and as one of my ‘grand pupils’ she is one of the first generation to spend their formative years influenced by my work. Also, since she inherited her horse as a whizzy, scarey, ewe-necked, upside down head-case, she and her teacher have worked wonders!
It is tempting to think that we must be looking at a naturally talented young rider, but we could be jmping to the wrong conclusion. For she has been learning to reproduce the skills that talented riders have innately. This process can enable ordinary, average but willing and hard working participants to evolve into convincing imitations of talented riders! The greatest barrier to learning is that good riders are such instinctive performers that they cannot describe what they do in words. But this girl’s teacher has been able to overcome this hurdle, breaking these skills down into their component parts and teaching them step by step in ‘bite-size chunks’.
I am sure that I am not alone in wishing that I had had these skills and such a nice little horse at the age of 11! But that would have been a different life, and my role in this one is to foster the skills of pupils and grand pupils can and will surpass me. I live in the hope that they will one day surpass the best in the world.
This photograph gives a wonderful overall impression of harmony and good organization, and there is much to like about it. But when we look closely we see that there is also much to learn. On the plus side, the horse is just a fraction off tracking up, where the hind hoof lands in the imprint left by the fore hoof. His tail is carried well, and looks to be swinging from side to side just as it should.
The top line of his neck does not quite form the ideal smooth curve from wither to poll, but is rather flat at the bottom whilst doing most of the curving close to the top. Notice how his mane falls to this side about two thirds of the way up his neck. The point where this happens is actually the highest point of his neck, and his poll, which should be higher, is not. Along with this, his nose is behind vertical. Compare the front line of his nose with the vertical arena boards, and notice that the discrepancy is bigger than you might have expected. For your eye is initially drawn to the line of the nose band on the bridle, which is closer to vertical.
It is always interesting to notice if there is a point on the neck where the mane falls to the other side. When this happens close to the horse’s withers, it can indicate that the shoulder on the side the mane falls to is lower than the other. This means that you should stop being frustrated by a mane that sticks straight up in the air, and perceive it instead as a good sign! In this photograph, the mane forms an additional indication that there is a ‘break’ by the third vertebra.
One sees this commonly, and if you think of a circuit of energy that passes from the horse’s hind legs, over his croup, under the panels of the saddle and up each side of his crest to his ears, it implies a ‘break’ in this circuit. The energy flow does not go all the way to the horse’s ears, so the circuit is not then completed by connecting from there to the bit, the reins, and via the rider’s arms to her back and the horse’s back.
This problem is subtle, but important. It is also very common (especially in horses who have been ridden in draw reins), and it is going to be difficult for our rider to correct. In fact, it is tricky for even a skilled, experienced rider to correct, and the muscles and ligaments at the base of the neck have to work differently before the top of the neck will change. The muscles at the front and inside of the rider’s thigh can cause this to happen, but I suspect that our young rider has her ‘brain space’ filled with more basic things she currently needs to think about. Once these happen on auto-pilot, she will be free to tackle the harder, more intricate stuff.
Here is an exercise for those of you who want to have a go at solving a similar issue. Put the fingers of one hand in the angle between your torso and thigh. Then lift your knee slightly, and feel for two tendons which stick up like taut pieces of rope. (If you only find one, do not worry, they can be hard to separate.) Then put the other hand on your knee and hold it down firmly whilst you attempt to lift it. The tendons should again stick up. Now keep those tendons ‘popped’ as you ride. It will help you to keep the base of the horse’ neck lifted in a way that can stop him from overbending.
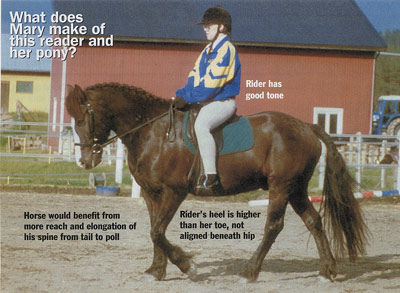
Back to our rider, who is in a really nice alignment. Notice the shape formed by the thigh and calf. I think of this as an arrowhead shape, with the knee at the point of the arrow. Her heel is in the right place underneath her, and is not too down and forward as one so commonly sees. Few riders make a big enough distinction between the flatwork lower leg, and the jumping lower leg, for over fences the rider’s security is dependent on the down and forward heel. However, on the flat this unbalances her, putting her into the ‘arm chair seat’.
When the rider treats the horse like an armchair, her body weight is placed in the center of his back rather than spread down through her thighs and more forward over his rib cage. The thigh then functions as a lever, with the weight that acts at the knee counterbalancing the weight of the rider’s upper body. Popping the front tendons makes this effect even more profound. This can cause the same muscle strain that you experience if you stand for any length of time in an ‘on horse’ position. But there is a pay-off for this effort, since the leverage created helps to draw the horse’s back up. In contrast, the arm chair seat squashes it down.
I observed about thirty riders in the warm up arena of the CDI at Hickstead last August, and was pleased to see that all but three of them had their stirrups a good length (with the thigh bone at about 45 degress to the ground) and their foot well under them. So at the top of the sport the overwhelming majority of riders are showing good mechanics, even though the dictum ‘stretch your leg down and push your heels down’ puts a lot of fledging performers off the scent.
I intially looked at this photograph and wondoured if the rider is in rising or sitting trot. She is leaning so far forward that I think she must be rising. However, in rising trot at this point in the stride, she will be either half way up or half way down, for she is maximally up or down when one pair of legs is vertical (a much less photogenic moment). This implies that she has made a very small rise, and she needs to thrust her pelvis much more over the pommel of the saddle to reach the balance point at which she could stay out of the saddle for two or more beats.
This is a worthwhile exercise to test yourself with. If you cannot easily remain balanced at the top of the rise, you too are not rising high enough. And/or, you have not kept your feet underneath you in the alignment shown here, holding the knee as the centre point of a circle and rotating the thigh over the knee. The knee does not then straighten as it would if you rose by pushing in your foot. Instead it remains in place with the knee cap pointing more down towards the ground as you rise. This, and the foot staying still and resting lightly in the stirrup, are signs that you are doing a good job. You may have to wait a little while before the changes in your mechanics filter through to your horse, but soon they will. Add in those ‘front tendons’ and you will have an even more powerful effect.
My best wishes go to our young rider, who is so lucky to be learning these skills so young!